Wednesday, January 18, 2023

TRS/Sci-Bot Worx - Waste Not, Want Not ep1

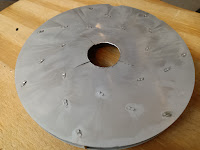
 Practice what you preach is what I try to live by and I've been screaming from the mountain tops that mankind has become too wasteful.  I believe that much of it is driven by the over supply of goods in attempt to get a return on investment and corporate greed.  Not here at TRS/Sci-Bot Worx!  Nothing breaks for good here.  We go to great lengths to either repair an item that is broken, reassign that item for another purpose, or dismantle it and reuse its components.  Today we will be demonstrating this first hand.  My wet/dry vacuum from 2004 has run into an issue.  The original aluminum fan blade has developed cracks in it due to stress caused by the use of the shop vac as a leaf blower.  The gyroscopic forces generated by the motor and the moment forces caused by the movement of my hand while blowing leaves have proven to be too much for the OEM blade.  

So upon this discovery, instead of throwing in the towel and spending another $139 for a comparable shop vac. I decided to 3d print a new fan blade (that was the easy part).  
Upon further examination of the motor shaft/axle, there appeared to be a large washer at the base that the previous fan blade sat against.  I thought that maybe this had fused to the motor shaft over time because I couldn't fathom how the motor could be assembled with this washer welded on.  So I tried to remove it with plyers, then tried to dremel it off all to no avail.  Some how it was apart of the motor shaft!  The next course of action was to see if I could get it mounted in the lathe so I could clean up the shaft that way.    
Seeing that I couldn't remove the motor from the plastic housing it was in, I knew that it was going to require that I get really creative in order to get in on the lathe.  I thank God that It just barely fit into my chuck and I was able to use a live center to support the free end.  This enabled me to turn what was left after I had hacked most of the washer off with the dremel.  


So back to printing.  I quickly modeled up a fan blade using the original aluminum one as a reference.  Then sent the file to be printed on my modified Ender 7, which made short work of it, and I mounted the blade to the motor shaft.  Mission accomplished, so I thought.  I reassembled the motor housing and flicked on the power switch.  As I had hoped, the vacuum began to suck again.  I actually thought the the suction had increased (I was wrong), but it was good enough for me to return to using the vac.  All of the celebration came to an end though once I began to use the vac as a blower again.  It was short lived as the motor began to heat up, the PLA fan blade began to warp causing it to rub against the motor housing.  
Not being one to give up easily, I then formulated a plan to create another fan blade, but this time it would be printed out of PA-12 CF (a Nylon with chopped carbon fiber filament).  Thankfully, I was able to use my recently finished custom drying oven to dry the PA-12 CF so that I could print the new blade.  The blade came out prefect, expect for one small detail.  Upon revisiting the OG aluminum blade I realized that I had the vanes of the fan blade curving in the wrong direction.  This required me to correct the model and then make another print.  Thankfully all that took place without a hitch.  


This little project was so much fun (not really, I just need my vacuum to work) that I even made a little video of the repair down below.  Thanks for reading and see you on the next repair.


No comments:

Post a Comment